Saturday, December 29, 2012

Cabin reassembly progress

Things have been moving along nicely with the cabin reassembly. Tom has made good progress and is doing a very good job. With the addition of several inches of snow the going has been slowed a bit. Walls are all up. Today's goal was to get the porch and loft boards laid in place.


These two surfaces will make working on the roof frame much easier.


Tom inspects and the cows approve!

With the ceiling/loft floor boards in the cabin space proper was nicely defined. You can almost feel the radiant heat coming off the hot wood stove as the steam rises from a nice cup of coffee can't you?

Nice way to finish up 2012.


Sunday, December 2, 2012

Easy but tricky

The weather was nice for reassembling the cabin but got a bit foggy by days end. After setting some nice limestone rock the sill and floor joists were laid square and level.


Tom got some recycled 3/4 Baltic Birch plywood to be used for sub-flooring. Even though it was an odd size with a little cutting we were able to hit the 24" O.C. floor joists.


With the door frames secure and plumbed we were on to the laying of the first rounds of wall logs. This should be easy (famous last words) right? Things were going along just fine until we had a collective brain laps. It took us a few minutes to figure it out (we couldn't find the 3 of hearts for the other corner). Wouldn't have been so bad if we hadn't put the four of spades log on top of this one. Oh brother, lost and don't know it!
 

Good news we survived and only got lost a few more times. Now Tom has to start drilling and pinning the wall logs where the windows will be cut in later.

Wednesday, November 28, 2012

Log Cabin Disassembly

The cabin building process in reverse has begun. It took three trips and about 15 hours but the cabin pieces are all racked at their new home and ready to be reassembled!


It got pretty late but we got the job done. Tom, the new owner has a nice spot by a spring on his hobby farm picked out for the cabin to sit on.

After removing the roof rafters and front porch it was time to use the jib crane to pick off the wall logs. Here Tom picks the first of many. Note: Taking down the jib crane and support bracing was a project in itself and required considerable planning and effort.

One down and 53 to go!

Keeping in mind that each half dovetail joint is unique and the cabin will only fit back together one way mixing up logs is not an option and must be avoided. I have found the use of playing cards cut in half to be the best way to accomplish this task. One suit for each corner. Simple but most effective.

Tom and Charlie made short work of the walls but we decided to make two trips, this was a good call. Tom was nervous about the load on the trailer and Charlie pointed out that the pile of logs on the trailer was getting pretty high which would soon require considerable effort to load the twelve remaining wall logs and 14 foot Oak 8x8 sill beams.

The last of it for awhile.

To keep myself busy until Tom gets ready to reassembly the cabin I decided to start making preparations on my EV conversion project. Over the next several months I will be transplanting the components of my 1980 Dodge Omni EV to a 2001 Dodge Caravan. The uni-body frame of the Omni rusted out and I got the Caravan for $200.

The Omni has been parked for the last two years and I started having trouble getting the 96 vdc battery charger to keep the pack charged up.

Whoa! Now I know why.


Saturday, November 24, 2012

Bench complete

Bink's bench is complete and just in time for Thanksgiving. He was a good neighbor and good guy to visit with. He would have enjoyed overseeing the building of this project from his kitchen window using some of his home sawn oak from the farm.  R.I.P  Bink

So now it is on to the next project. Moving last winters cabin kit project built from the recycled barn timbers to the new owners land and reassembling it there. Should be fun.

Sunday, November 18, 2012

Behind the curtain

Back of Bink's bench is coming along nicely, should have it done by Thanksgiving. Plenty of mortise and tenon work on this piece.

Got a good fit on the joints and softened the edges with a 1/4" round over bit in the shaper.
Now just have to mate the back to the bottom and this project is done.  Bink would have enjoyed watching my progress from his kitchen window across the street. And that brings me to another story about my neighbor.

I had been doing several chainsaw wood carvings one summer and on some of my many breaks I would wander over to Bink's for a visit and to see how he thought the carving was coming. The carvings would always start off pretty rough and were hard to identify. Bink had a good eye though and had studied many of my carvings "in process". He made some pretty good guesses on what the final carvings would be and we would enjoy talking and joking about it.

A week or so later I set up a new log for carving and began the process. This time I noticed Bink had opened up his living room curtains and it looked like he was going to change his point of view. I carved away for most of the morning making some major cuts but by no means to the point of where anyone could tell what the finished carving would be. After lunch Brink drove out to check the crops and I thought I would play a prank on him. I moved the carving out closer to the road and than put up a big blue tarp that I had around the carving. For the next four days I spent several hours on and off "carving". I would go inside and carve. Even after I finished the carving I continued to go inside the tarp with my saw and "carve away". I cut and re-cut the pieces. On many of my trips to the mystery carving I could see Bink in his window and gave him a big wave and hi. We had some fun talking about that carving later that summer.

Bink had one of those riding lawnmowers (Dixon ZTR) that you steered with two levers and required both hands to move. It was always fun to give Bink a big friendly high neighbor wave and see if he would let go to wave back causing the mower to go off course. No matter what he always smiled! I think he was on to me.

Tuesday, October 30, 2012

Trapping Muscrats on the Pec

Built this little jig thinking I could make the cheek cuts for the tenons on my table saw.
 Bad idea. No good control or adjustment over the vertical plumb which lead to an angled tenon on my practice piece. You can see from the pictures that follow that I solved the problem.


Which brings me to my story of another bad idea I had back in the 70's and an encounter I had with my ol' neighbor Bink. I had decided to suppliment my teaching income by trapping Muskrats in the Pec river. At the time the hides were selling for around $3.  The first step, getting traps was easy. I ordered a dozen 1 - 1/2 single spring traps from Herders for $35. There 3' Kodiac Bear trap (could be used as a foot scraper!) caught my eye but that's another story. Now the banks of the Pec are very steep and muddy I was going to need something to float down the river and set my traps. At the time the local utility was putting in under ground lines and there were many of those large wooden reels all over the area. I latched on to a 6' diameter monster for the wood. I decided by using a couple of 30 gallon steel barrels I had I could build my very own raft! I set about this task in the school shop, after school on a Friday. I would work all nigh if I had to, and I did so I could set traps Saturday. Around 3 am the town cop drove by the shop, saw the lights on and wanted to know what I was doing. After hearing my plans he just shook his head and drove off.

7 am Saturday morning and the sun was coming up. My raft was assembled. Huck Finn would have  been proud. It was small 3' by 4' but sturdy with a rim all around to keep the barrels in place. Wow, was it heavy. Had a heck of a time getting it into my 1959 Chev truck but managed somehow. Running on adrenalin I went home to get my traps and gear needed to set out my trap line. This was going to be great.

Paddle
Push pole
Rope to tie up raft
Traps
Stakes
Wire
Wire cutters
Hatchet
22 pistol

I parked by the bridge on Roller Coaster road about a mile from Bink's farm and unloaded the raft. I was struggling with it and as luck would have it Bink and his son Randy (one of my students) driving by stopped and gave me a hand dragging it to the rivers edge. As they watched over the bank and in it went. I tied it up and went back to the truck to get my traps and gear. I was pumped! Soon I would be poling my way up river, trappin' rats.

Just as I started loading on my gear I thought (imagine that) maybe I should test it first before I load all my stuff on it. See how it handles. So I took everything off the raft. As Bink and Randy watched I put one foot on the raft and just like that, woosh, it flipped like a pancake! They were stunned and I was up to my waste in mud looking at my upside down raft! They helped my drag it out of the river and load it back onto my truck. I said I didn't expect that and Bink politly agreed with me. I'm sure they had a good laugh on the ride back to there farm. Some years later in one of our visits Bink and I had a good laugh recalling the raft story.

Next time - Behind the curtain...


Sunday, October 14, 2012

Bink's Bench

New project in the works. Bink's bench. As it is a memorial to his life and passing it will be a labor of love. Along the way of turning some of Bink's home sawn oak into this bench I will share some of the stories that I encountered over the years as I got to know my neighbor across the street.

A widowed retired farmer, Bink had many stories to tell and spent long hours at his kitchen table, in his chair, looking out his window, keeping an eye on one project or another I always had going in my yard across the street. Living into his 80's Bink had traded in his tractor for a truck and always kept a hand in watching over the family farm and crops that one of his son's took over. I had the pleasure of having some of his children and one of his grand children in shop classes that I taught at the local high school!

After his passing, a daughter, Kathy asked if I could build a bench out of the home sawn oak that Bink had stored in his garage. The bench would be placed at his church in an outside sitting area as a memorial. Kathy sent me a picture (shown above) of what she and the family had decided on.

Step one - Drawing up a working set of plans and selecting the material.
Anyone that has ever worked with ROUGH home sawn material knows the challenges it presents and can appreciate how Menards individually wraps and prices hardwood boards. For me it was a matter of sizing up individual boards and determining the individual bench parts that could be gotten from each one.

From past experience I know the waste that can be generated trying to smooth long, wide. cupped and twisted boards with a surface planer. To minimize this I decided to take each rough board, rip and crosscut the pieces for the bench first. Then surface each piece to its finish thickness. This worked great.

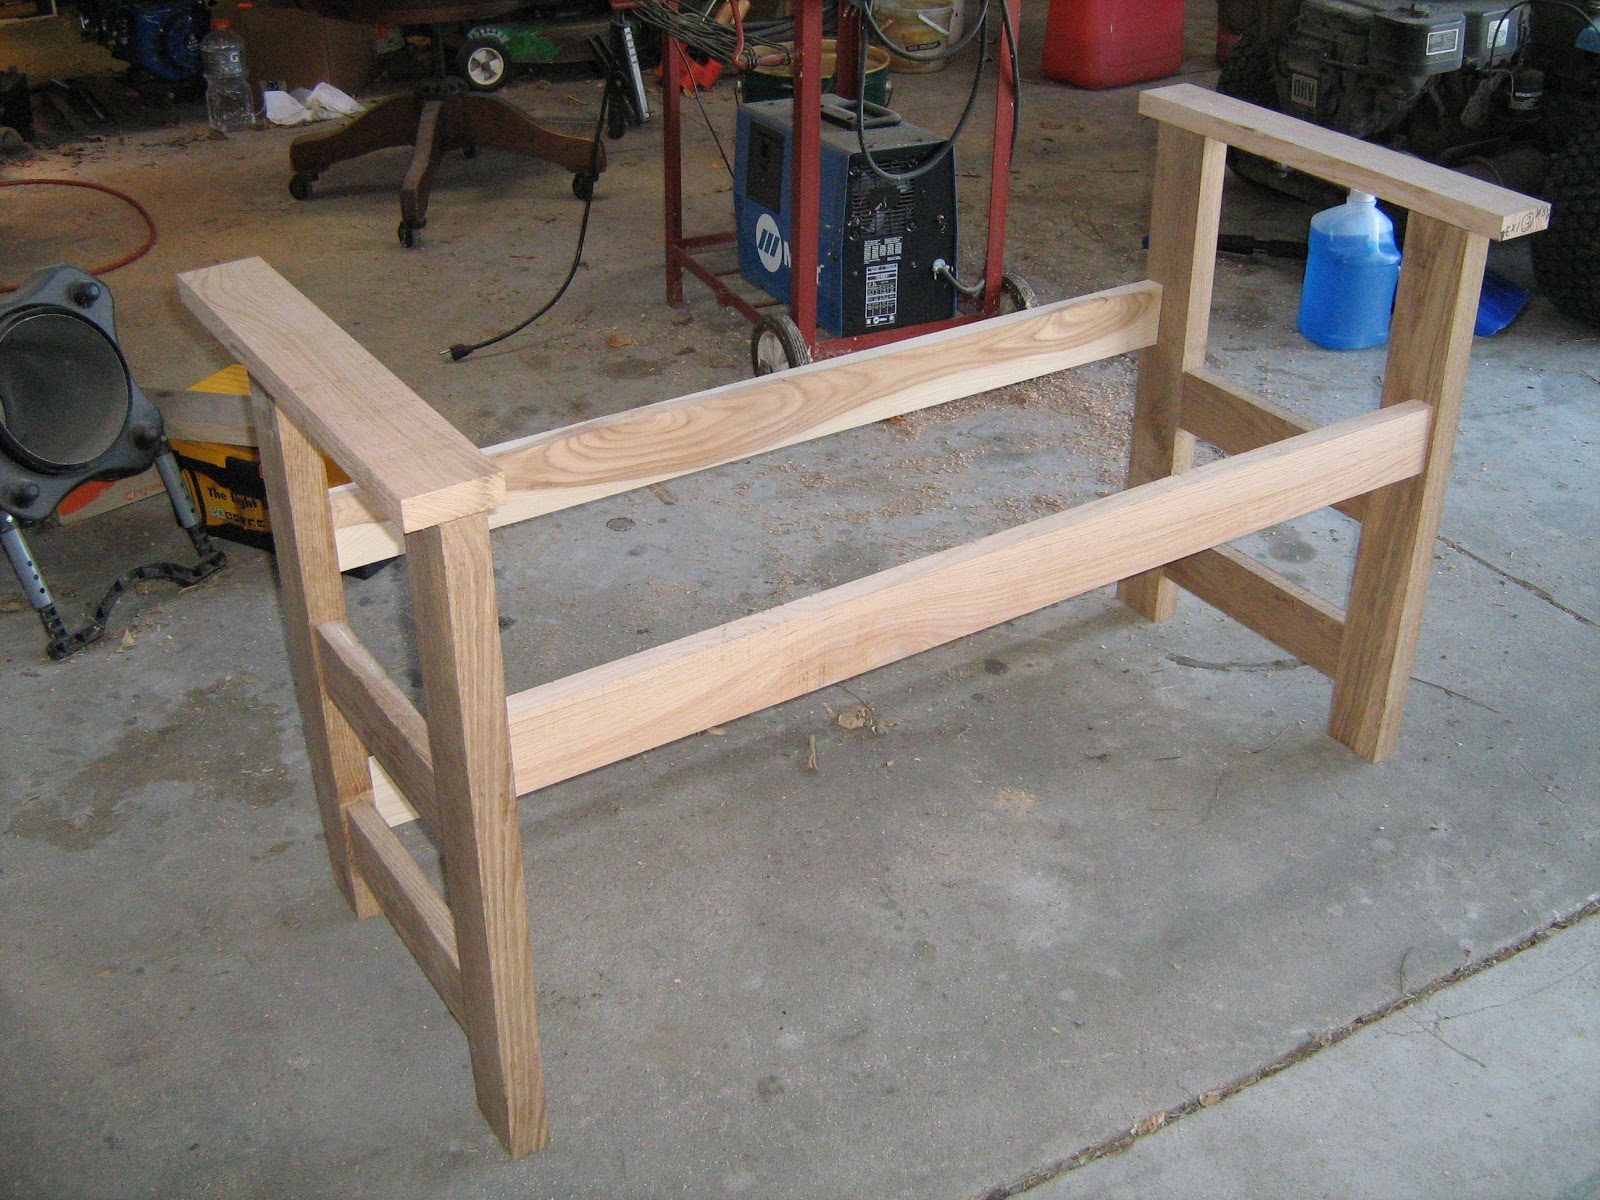
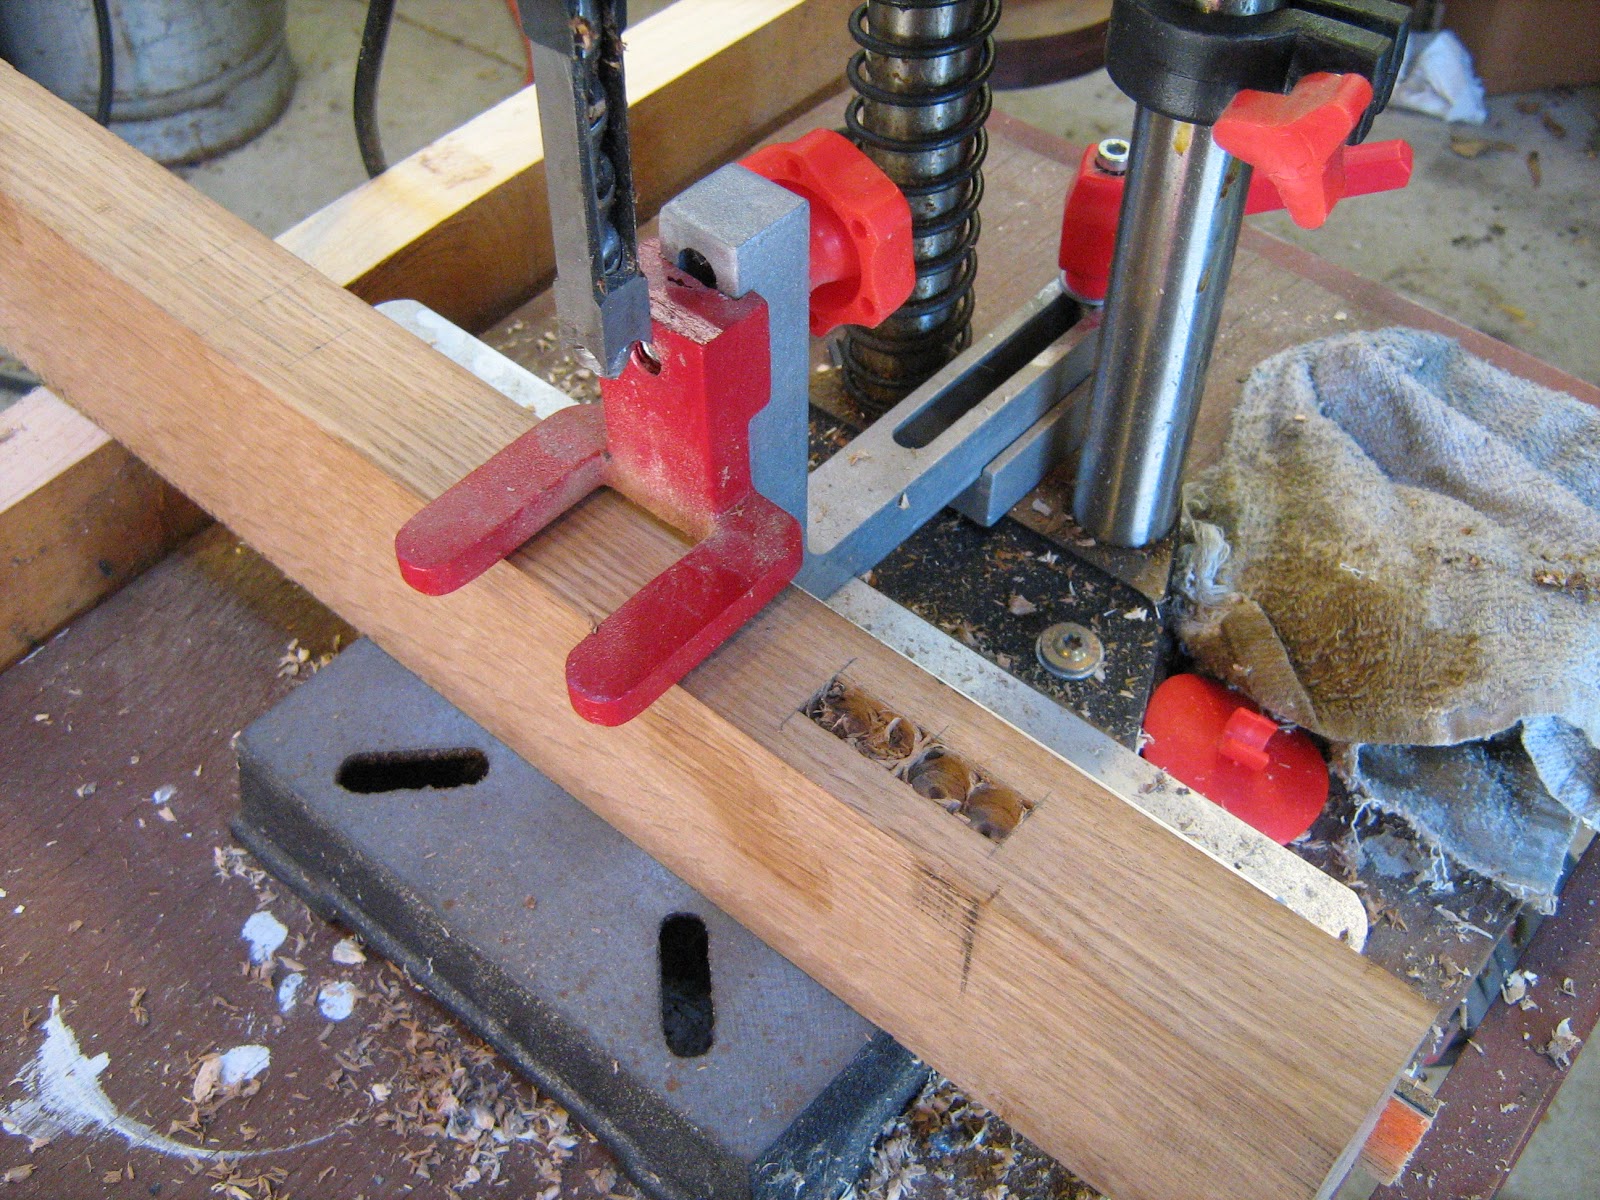
After some final ripping, jointing and cross cutting I had the pieces to finished dimensions and could begin the joinery work. Drilling square holes is no problem with the mortise drill.
 Location and layout of the many individual mortises is tricky and will required some focused concentration. Then it will be on to cutting the tenons on the mating parts to complete the bottom of Bink's bench.


Next time, Trapping Muskrats on the Pec river.

Sunday, September 30, 2012

So much more fun

Will be enjoying the fruit of my labors soon as I finish up the electrical wiring and lighting.
Trenching in the 3/4" PVC  from the PV to the bridge.

The 14 gauge wire carrying the 120 volt AC from the 600 watt inverter will flow through a 15 amp fuse, shut-off switch and to three different, individually controlled light strings. One string of four 60 watt CFL's indirectly lighting the outside of one truss. A second string of four more 60 watt CFL's down the center of the bridge on the inside of the bridge. Third, six strings of LED lights covering the gable ends and back top chord inside.

The pictures with my digital camera don't do justice to the lighting but you can get the idea.

Until you come and see for yourself the 4 timber framed covered bridges in Lafayette county, Wisconsin you'll just have to take my word for it they are pretty cool!

On the solar PV system electrical technical side:
- Input
Six individual photovoltaic (PV) panel for a total of 350 watts, 12 Vdc, of PV capable of generating 11 amps of current input to two 6 volt deep cycle batteries.  In there present location by the bridge on a sunny day they are capable of supplying the batteries with 25 amp hours (Ah) of energy from the sun.

- Demand (DC to AC includes inverter)
Four 60 watt CFL's draw 6.2 amps for a load on the batteries of 6.2 amps per hour (Ah).
Six strings of LED lights draw 4.8 amps for a load on the batteries of 4.8 Ah.

The challenge over the next year will be to determine the lights to be used and the time to program the 12 volt dc timer to turn the system on and off so as not to drain the batteries. Should be a fun and educational experience.

Now on to the next project. A nice oak bench for my old neighbor Bink.


Friday, September 21, 2012

Let there be light...

Time to add a little power to the bridge to brighten it up at night. I had a 350 watt, 12 volt PV battery system that I built several years ago for a high school class on renewable energy I was teaching just sitting around. The class project system was featured in Home Power magazine Dec '99/Jan 2000 Issue #74 pages 24-30. All the system details can be found on line in this article.


Powering up the bridge with lights at night would be a good use for the system. One would think this  system is way over kill for just four 16 watt CFL's but we'll see.  Time will tell. There will be some shading of the panels because of the location but the excess PV capacity should more than make up for it. I hope.


Things tend to get messy pretty quick with all the components and wiring that goes into a battery PV system as you can see below. Two 6volt deep cycle batteries, battery monitor, charge controller, fuse box, inverter and lights. For new construction component placement comes first and then the wire cut and routed. On this recycle project I found it best to just connect the components with existing wire lengths and then place them where they fit.

And the final results were efficient and pleasantly surprising.


It was a pretty sunny day yesterday so I collected some data on the new system. In a nut shell - From 1 to 3 pm the PV generated 7.2 Amp hours of power to store in the batteries. I turned on the four CFL's for one hour and they (along with the inverter) consumed 10.1 Amp hours from the batteries. Hopefully I can count on 2 - 3 more hours of morning sun. In the meanwhile I'll be doing more data collection and testing to report in a later post.

Monday, September 3, 2012

Oh Wow!

After considerable thought I have decided to go with  a metal roof. The metal roof will be less costly, require less labor and perform better in my wooded location. I had enough 2x4 material on hand for the perlins so it was a go.

 First order of business was to close in the gable ends. In this way I could cut the notches where the perlins would extend for the rake overhang to fit nicely. Note: if you look down the peg line in the top right chord you can see the camber of the truss.

Nice!

Ramps and a floor.

Ready for steel.

Starting in the center and working toward the ends because of the camber in the trusses.

One fine looking bridge if I do say so myself.

 Portal view at night.

Even installed some lights to make the bridge glow at night. These will be run by some solar panels from an old system that I have.  Like I told my students, "Crossing a bridge in your future will be a bit easier after you have built one or two."


Sunday, August 26, 2012

A good days work

With the help of a few "buds" and some nice weather the second bridge truss was raised. The floor joists and roof trusses put in place and the project now looks more like a bridge.

Gin poles doing the heavy lifting.

Floor joists "buttoned" in place.

Roof trusses on.      Next up the roof, deck and access ramps.